Mastering Project Success: A Step-by-Step Guide to Using Baselines in Primavera P6
What is a Baseline?
In project management, a project baseline serves as a snapshot of the project schedule at a specific moment. After entering all essential data—such as activities, relationships, and resources—you should create a baseline to capture this information.
Project baselines are crucial for tracking and comparing changes as the schedule evolves. It’s best to establish baselines before making updates, allowing you to assess progress by comparing actual performance against the baseline.
How to Use Baselines in Primavera P6
In Primavera P6, when a schedule is created, it automatically assigns original dates, durations, units, and costs, reflecting the anticipated time and budget for each activity. These original dates indicate ideal start and finish times based on various factors.
The main purpose of a baseline is to provide a reference for monitoring project performance. After updates, you can compare actual data against the baseline to assess project status. Primavera P6 allows you to view baseline data alongside current project information in the activity table and Gantt chart for comprehensive analysis.
You can create multiple baselines, with up to three compared at once, helping you track progress, manage claims, understand delays, and refine future scheduling techniques. This article will guide you through creating and maintaining baselines in Primavera P6.
Creating a Baseline
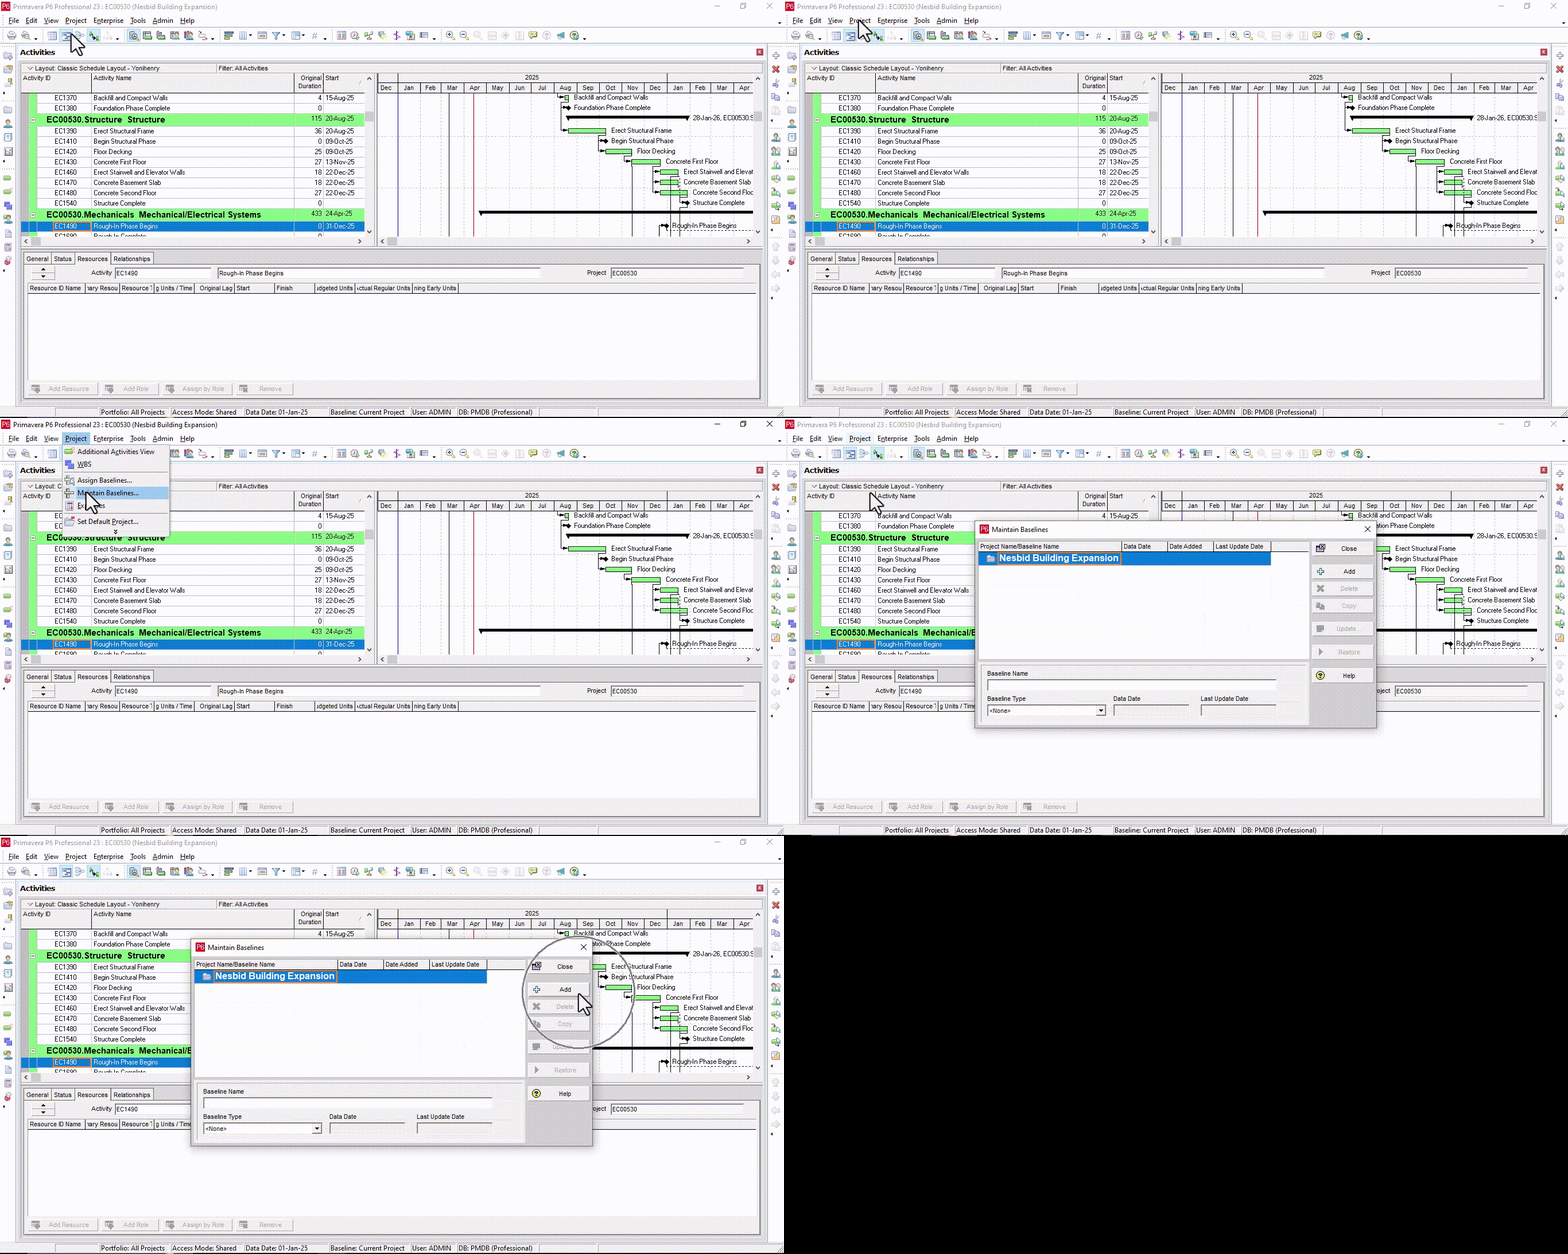
To create a new baseline in Primavera P6, navigate to Project > Maintain Baselines.
The Maintain Baselines window opens, displaying your saved baselines at the top and options to modify them at the bottom. If this is your first baseline, the project folder will be empty.
You only need to have your project open; the activity screen layout can be adjusted later. To create the baseline, click Add.

A prompt will appear asking if you want to save a copy of the current project as a new baseline or convert another project to serve as a baseline. Generally, you’ll choose the first option to save a copy of the current project.
Since this is the initial baseline and we want to capture the project as it is now, select Save a Copy of the Current Version as New Baseline and click Okay.

The baseline is now created.
Adjusting Baseline Details
To modify baseline details, select it from the top table and use the bottom section to edit:
- Baseline Name: Change the name of the baseline. Since this is the first one, you might name it Initial Baseline.
- Baseline Type: Choose a type that best describes the baseline. This field is optional, but for the initial baseline, you could use Initial Planning Baseline.
- Data Date: This shows the date when the baseline was created and cannot be edited. The Last Update Date displays today’s date or the date of the baseline creation.

Once you’ve adjusted the details, click Close to exit the window. It’s best practice to create additional baselines after each status update, providing multiple reference points throughout the project lifecycle.
Ready to take your Primavera P6 skills to the next level? Take a look at our virtual and in-person training options.
Recent Posts
Transitioning from Primavera P6 to Oracle Primavera Cloud: Resource Analysis
Transitioning from P6 to Oracle Primavera Cloud:Resource Analysis Resource Analysis: Primavera P6 vs. Primavera Cloud…
Read MoreGlobal PM’s Training Courses
Global Project ManagementCourse Offerings Global PM offers comprehensive, hands-on training for project management professionals, specializing…
Read MoreTransitioning from Primavera P6 to Oracle Primavera Cloud: Mastering Resource Management
Transitioning from P6 to Oracle Primavera Cloud: Mastering Resource Management Switching from Primavera P6 to…
Read MoreAgile Project Management in Construction? A Modern Approach to Building Smarter
In an industry known for tight deadlines, complex stakeholder relationships, and ever-changing site conditions, Agile…
Read MorePrimavera P6 to Oracle Primavera Cloud: The EPS vs. Workspaces
Primavera P6 to Oracle Primavera Cloud: The EPS vs. Workspaces Author: Kari Jackson, PMP, PMI-ACP…
Read More