Quick Tips to Improve Your P6 Scheduling
Best Practices for Crafting Efficient P6 Schedules
1. Start with a Solid WBS Structure
A well-organized Work Breakdown Structure sets the tone for clarity. The WBS decomposes the project’s scope of work and organizes activities into work packages. A well-organized WBS is helpful in planning to aid in breaking the scope of work down so you can effectively plan the work. Once baselined, the WBS is equally useful to prevent scope creep, work not identified within the WBS is outside of the approved scope and should be routed through the change control process.
2. Use Activity Codes Strategically
Group and filter activities with purpose. While completely optional for a schedule, activity codes can open the door for a more accessible, useful, and organized schedule. Activity codes are tags. They tag activities with characteristics unique to the project or the organization. These tags then enable you to isolate activities based on their unique characteristics. Imagine being able to see all the work assigned to a specific subcontractor related to contract item A within Area 3 of the jobsite – with activity codes this is achievable in a matter of moments. Like having a magic wand to report, analyze, and view the schedule from as many different angles as needed. The possibilities are seemingly endless.
Check out our YouTube video about using Activity Codes for a more manageable schedule:
3. Avoid Open-Ended Logic
The bones of your CPM schedule are the activity durations and relationships – aka logic. Together these activity characteristics determine the schedule dates of every activity and the overall project duration. When creating your schedule, the importance of logic cannot be understated, a project schedule with broken logic will not accurately reflect start and finish dates or total float.
Every activity should have at least one predecessor and one successor to ensure the activity does not “break” the critical path calculations as they pass forward and backward through the schedule. Activities without predecessors are not reliant on the completion of any other work in the schedule and therefore are scheduled to start as soon as possible – the data date. When these activities are not performed and therefore not updated, they will be reforecasted to start with the new data date, making any baseline measurements meaningless. Activities that lack successor activities utilize the project’s finish date as their late finish, skewing the total float value and displaying more positive float than is realistic.
Check for open-ended activities within the schedule log each time you schedule the project. The only acceptable open-ended activities are the first and last activities in the schedule and WBS Summary activities – all other activities should have both predecessor and successor relationships.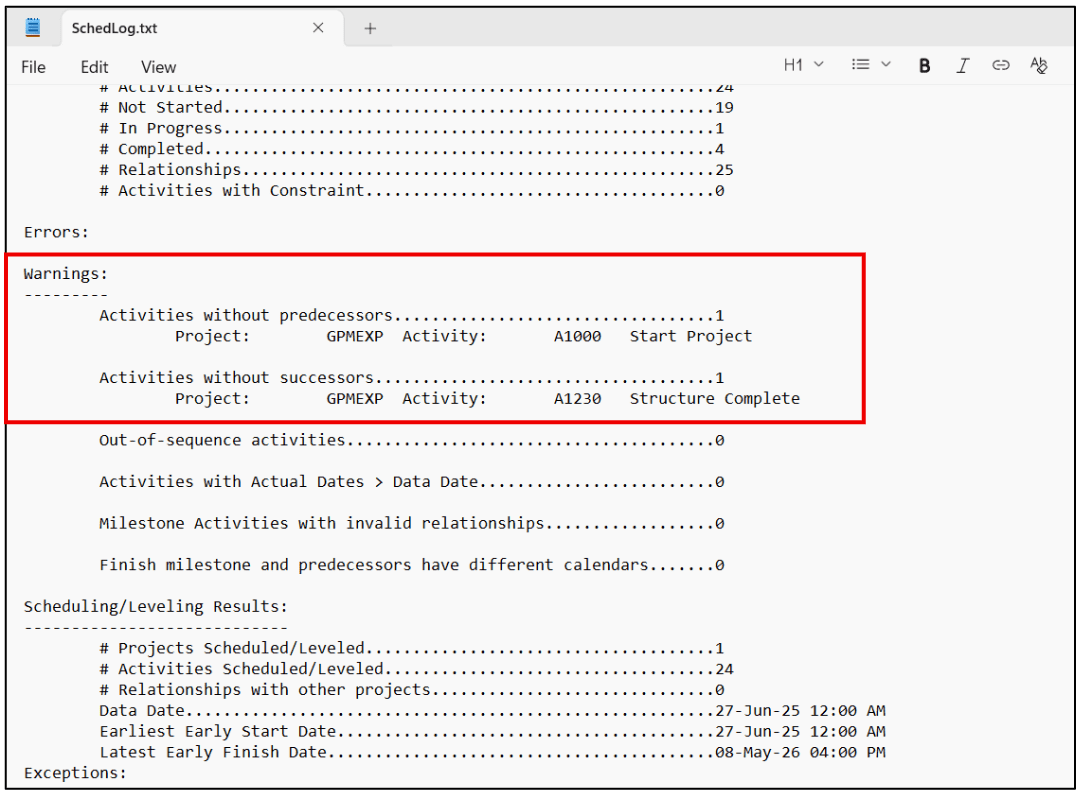
4. Limit Use of Constraints
Constraints should be the exception, not the rule. They act as pushpins in the schedule, stopping the forward and backward pass calculations to impose our own early and late dates for work. You should review the number of constraints your projects have assigned regularly and ensure all constraints are valid.
Another helpful habit to form when it comes to constraints is documentation. Use the Notebook tab, user defined field, or even the Discussion feature to document why you chose to constrain the activity, the date you did it, and the user who made the change. Adding context to a constraint can be helpful for a number of reasons. Projects can be very long, sometimes years in duration, the reason a constraint could be forgotten or even accidental. Have you ever tried to select a date from the Status tab and received a prompt about setting a Start On or After constraint or similar? Or worse, have you done this and failed to read the prompt and just clicked OK?
When constraints go unchecked in the project, they can tie up the schedule, causing unrealistic total float and prohibiting the flow of logic and therefore your ability to effectively manage and forecast the schedule. Try to limit the use of constraints so your schedule can flow based on the logical sequence of project work.
5. Baseline Early and Often
Baselines are not just for capturing the approved project plan, while this is an obviously important aspect of a baseline, creating additional baselines provides you with a record of the project schedule with each update. Baselines help track progress, validate changes, and support forensic schedule analysis. Consider capturing a baseline before each update or at key milestones throughout the project. If you reach your limit for baselines set by your application administrator, consider creating a copy of the project which can be converted to a baseline when needed.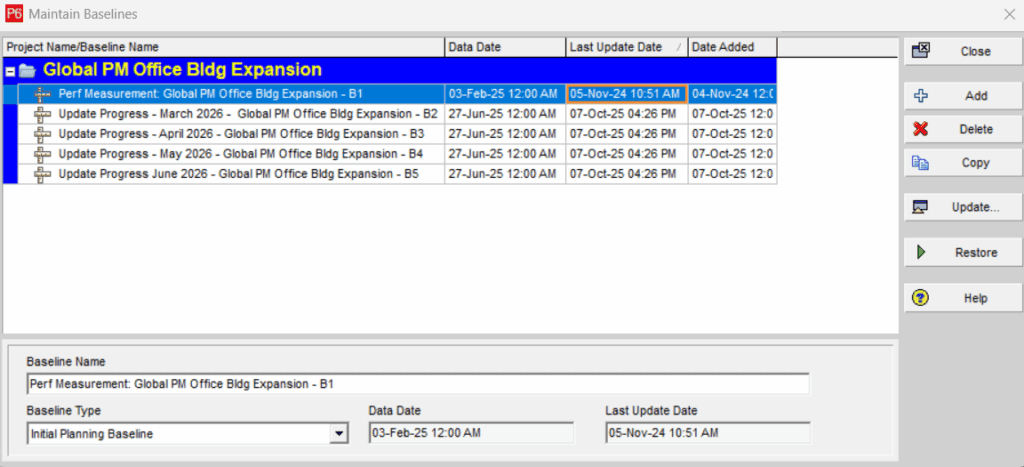
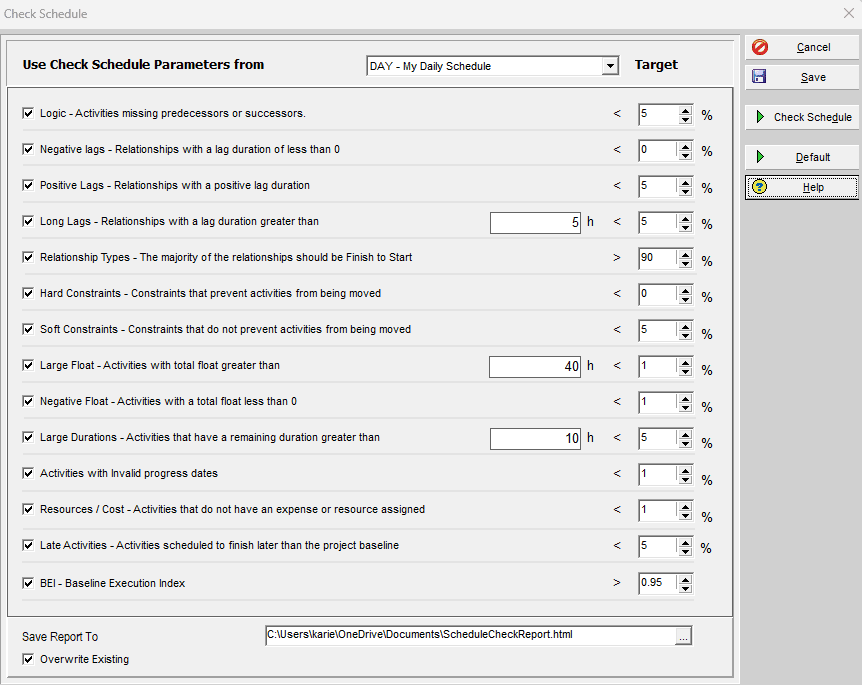
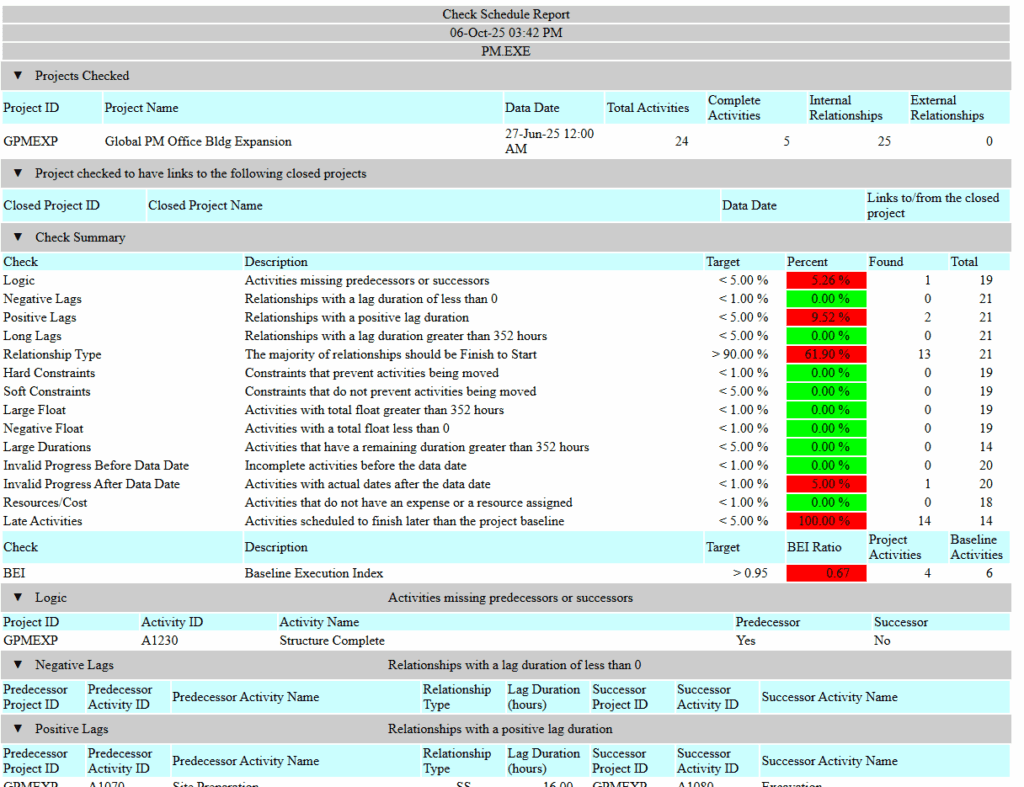
6. Audit Your Schedule Before Publishing
Run diagnostics: check for out-of-sequence activities, missing logic, and calendar mismatches. A clean schedule builds trust. Both the projects Schedule Log and Check Schedule Report can help you identify problematic areas in the schedule. The schedule log provides helpful information but cannot be customized to your standards like the Check Schedule Report.